
Back when I first joined the Electronics Section at The University of Manchester. when we designed equipment we would label it with Dymo labels. Weeks sometimes months of detailed thought, design, construction and testing would be finished with 5 minute, wonky labels, that dropped off 3 months later.
I personally think aesthetics and UI/UX is as important as the functionality of the equipment itself. So over the next year on and off I researched methods of creating front panel labels efficiently and cheaply.
There are bucket loads of companies out there that will create the front panel label for you, however after emailing a few and getting an average quote of £80 per label (we’re low quantity 1-10) its was a none-starter. So I started looking to how these companies create the labels themselves.
I thought I’d go through the solutions I found, as I couldn’t find any one else documenting these.
UV Curable Ink Printer
It turns out that most companies print graphics onto the back of velvet / matt polycarbonate sheets (mirror image) using a UV curable ink printers.
UV curable ink printers use a piezo printing head which basically throws the UV curable ink towards the surface it’s printing on. The print head then shines UV light at the ink which cures the ink. This means the printer can print on uneven surfaces across large areas. Cool right?
Before I explain the process of creating a label you first have to understand that normal printers can’t print the colour white. This is why it’s important that the paper you print onto is white to get accurate colour prints. However UV curable ink printers can print the colour white along with the standard CMYK (cyan, magenta, yellow, and black). This means that UV ink printers can print onto any colour surface and achieve accurate colour prints.
Now the summary is UV printer is over, threw, I’ll explain how they are used for electronic front panel enclosures. First they print the panel’s graphics (mirrored) onto the opaque polycarbonate sheet. Once the image has been printed in CMYK they then print over the graphic again in solid white. If you know look through the polycarbonate form the opposite site to the print you will now see your front panel graphic. This graphic is then laminate with generally 3M 467MP adhesive backer, which allows you to stick your graphic onto you equipment.
You now have a complete label however we need to cut out the label from the larger sheet and any inner holes / slots etc. This is can be done three main ways, drag knife, laser cutter or cnc router. I suppose you could maybe use a vinyl cutter however I’m not too sure how long it will last with the polycarbonate overlay. Also sometimes the 3M adhesive back is cut out first so its slightly smaller than the end label cut out.
This is the process I’d go for however to get a good reliable UV printer your talking around £20k. You can get some cheaper for £1-5k but I can see them going wrong with limited manufacturer support. Oh and the inks are freekin expensive!
Sublimation Process
I won’t go into depths into this method as there is a lot of information about it online. However it basically involves printing sublimation inks onto special paper. The paper is let aligned over the substance you want the transfer on. You then press the two together with a heat press. The sublimation ink then vaporises and effectively dyes the surface of the substance.
Once the sublimation has taken place, even though the end graphic is not laminated it is still incredibly tough. This is because your graphic has bonded at a molecular level. Once again you would the adhere 3M 467MP adhesive backer to stick the front panel label to your equipment.
The problem with this method is with the colour white and black (there not always available at printing). Generally the substance your transferring the graphic onto has to be lighter than the graphic itself. Hence your substance can’t be opaque like above, it will have to be solid white possible a PVC sheet?
Once again like the above, the problem is that the good printers are expensive and the cheap ones (£500+) need constant maintenance as the print heads get blocked, that’s a total DIY jobby.
Sam’s Secret Sauce Lamination Process
After hitting highs and lows with the above two methods I sat down and tried to figure out a method that I can do with equipment I already own. After more hours of searching and thinking that I would care to admit I developed the perfect sequence.
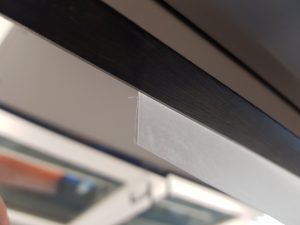
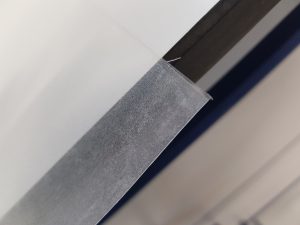
First I sourced the 3M adhesive and polycarbonate sheets used in the above UV curable ink printing method. I laminate them to create a polycarbonate sheet sticker.
| Top | Adhesive Side |
 |
 |
Next I printed my front panel design on special polystyrene printable sheet. This sheet is white and can be printed on with any normal laser printer.
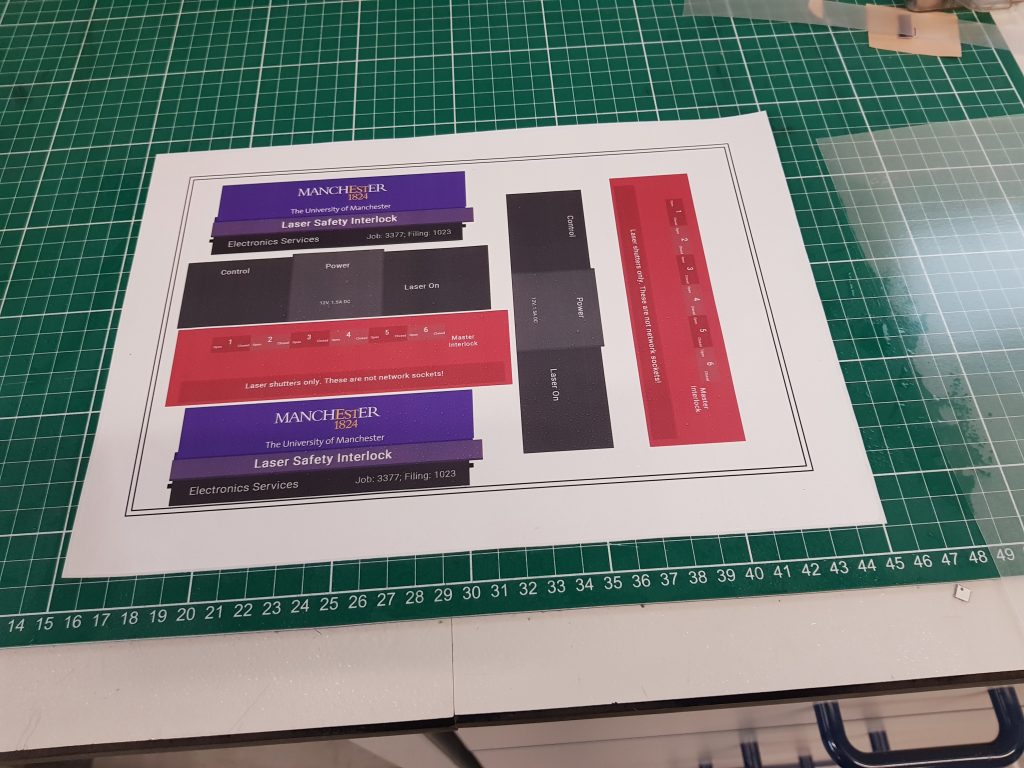
After that I laminated the printed sheet with the polycarbonate sticker using water to ensure no air bubbles. This process may sound simple and it is, but it creates the most amazing effect. The labels are also incredibly durable as the printed sheet is laminated with polycarbonate.
After calculation of the costs of materials, this process works out around £5 per A4 sheet, this does not take into account any failures and CNC cutter wear.
In part two I’ll go through the process of the initially design and routing.


